Ever felt like managing AWS resources through the console is slow and repetitive? Enter AWS CLI — your command-line shortcut to full cloud control. Fast, scriptable, and powerful, it’s a game-changer for developers and sysadmins alike.


What Is AWS CLI and Why It’s a Game-Changer

The AWS Command Line Interface (CLI) is a unified tool that allows you to interact with Amazon Web Services directly from your terminal or command prompt. Instead of clicking through the AWS Management Console, you can manage services like EC2, S3, Lambda, and IAM using simple text commands.
Understanding the Core Functionality
The AWS CLI acts as a bridge between your local machine and AWS services. It sends API requests to AWS on your behalf, translating your commands into actions across the cloud. This means you can launch servers, upload files, configure security groups, and automate entire workflows — all without touching a mouse.
- Supports over 200 AWS services
- Available on Windows, macOS, and Linux
- Open-source and actively maintained by AWS
“The AWS CLI gives you programmatic access to AWS services, enabling automation, scripting, and integration into CI/CD pipelines.” — AWS Official Documentation
Key Advantages Over the Web Console
While the AWS Management Console offers a visual interface, the AWS CLI provides precision, speed, and repeatability. Need to spin up 50 EC2 instances? With the console, that’s tedious. With the CLI, it’s a single loop command.
- Automation: Script repetitive tasks using shell scripts or Python.
- Consistency: Eliminate human error in deployment processes.
- Speed: Execute complex operations faster than clicking through menus.
- Integration: Embed AWS operations into DevOps pipelines like Jenkins or GitHub Actions.
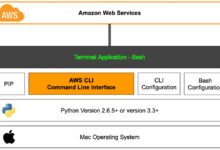
How to Install and Configure AWS CLI
Getting started with the AWS CLI is straightforward, but proper setup is crucial for security and functionality. Whether you’re on Windows, Mac, or Linux, the installation process is well-documented and user-friendly.
Step-by-Step Installation Guide
Before installing, ensure your system meets the prerequisites: Python 3.7 or higher for AWS CLI v2. The latest version (v2) is recommended due to enhanced features like improved auto-suggestions and SSO support.
For macOS:
- Download the installer:
curl "https://awscli.amazonaws.com/AWSCLIV2.pkg" -o "AWSCLIV2.pkg" - Install via terminal:
sudo installer -pkg AWSCLIV2.pkg -target / - Verify:
aws --version
For Linux:
- Use the bundled installer:
curl "https://awscli.amazonaws.com/awscli-exe-linux-x86_64.zip" -o "awscliv2.zip" - Unzip and run:
unzip awscliv2.zip && sudo ./aws/install - Check installation:
aws --version
For Windows:
- Download the MSI installer from AWS CLI v2 MSI Installer
- Run the installer and follow prompts
- Open Command Prompt or PowerShell and type
aws --version
Configuring AWS CLI with IAM Credentials
Once installed, you must configure the AWS CLI with credentials so it can authenticate your requests. This is done using the aws configure command.
- Run:
aws configure - Enter your AWS Access Key ID
- Enter your Secret Access Key
- Set default region (e.g.,
us-east-1) - Set output format (
json,text, ortable)
These credentials are stored in ~/.aws/credentials (Linux/macOS) or %USERPROFILE%.awscredentials (Windows). Never hardcode credentials in scripts — always use IAM roles or environment variables in production.
“Best practice: Use IAM roles for EC2 instances and temporary credentials via AWS STS for enhanced security.” — AWS IAM Best Practices
Mastering AWS CLI Commands: Syntax and Structure
Understanding the syntax of AWS CLI commands is essential for effective usage. Every command follows a predictable pattern, making it easier to learn and remember as you scale your cloud operations.
Breaking Down the Command Format
The general structure of an AWS CLI command is:
aws [service] [operation] [options]
- aws: Invokes the CLI tool
- service: The AWS service you’re targeting (e.g.,
s3,ec2,lambda) - operation: The action to perform (e.g.,
create-bucket,start-instances) - options: Flags like
--region,--profile, or input parameters
Example:
aws s3 ls s3://my-bucket --region us-west-2
This lists objects in an S3 bucket located in the US West (Oregon) region.
Common Global Options You Should Know
The AWS CLI supports several global options that modify how commands behave. These can be used across all services.
--region: Specifies the AWS region (e.g.,--region eu-central-1)--profile: Uses a named profile from your credentials file (e.g.,--profile dev-user)--output: Changes response format (json,text,table)--no-paginate: Disables automatic pagination for large result sets--query: Filters JSON output using JMESPath expressions (more on this later)
You can also set these as defaults during configuration or via environment variables.
Essential AWS CLI Commands for Daily Use
Once you’ve mastered the basics, it’s time to dive into practical commands. These are the bread and butter of AWS CLI usage — the ones you’ll use daily to manage infrastructure, debug issues, and automate tasks.
Managing EC2 Instances with AWS CLI
Amazon EC2 is one of the most widely used services, and the AWS CLI makes managing instances efficient and repeatable.
- List running instances:
aws ec2 describe-instances --filters "Name=instance-state-name,Values=running" - Start an instance:
aws ec2 start-instances --instance-ids i-1234567890abcdef0 - Stop an instance:
aws ec2 stop-instances --instance-ids i-1234567890abcdef0 - Terminate an instance:
aws ec2 terminate-instances --instance-ids i-1234567890abcdef0 - Launch a new instance:
aws ec2 run-instances --image-id ami-0abcdef1234567890 --count 1 --instance-type t3.micro --key-name my-key-pair --security-group-ids sg-903004f8 --subnet-id subnet-6e7f829e
Using filters and queries, you can extract specific data like public IPs or instance types.
Working with S3 Buckets and Objects
Amazon S3 is the backbone of cloud storage. The AWS CLI provides robust tools for uploading, downloading, and managing buckets and files.
- Create a bucket:
aws s3 mb s3://my-unique-bucket-name --region us-east-1 - List all buckets:
aws s3 ls - Upload a file:
aws s3 cp local-file.txt s3://my-bucket/ - Download a file:
aws s3 cp s3://my-bucket/remote-file.txt . - Synchronize a folder:
aws s3 sync ./local-folder s3://my-bucket/backup/ - Delete an object:
aws s3 rm s3://my-bucket/unwanted-file.txt - Remove a bucket (must be empty):
aws s3 rb s3://my-bucket
The sync command is especially powerful — it only transfers changed files, making it ideal for backups and deployments.
“The
aws s3 synccommand is a lifesaver for developers managing static websites or application assets.” — AWS CLI S3 Guide
Interacting with IAM and Security Settings
Security is paramount in AWS, and the AWS CLI allows you to manage IAM users, roles, and policies programmatically.
- List IAM users:
aws iam list-users - Create a user:
aws iam create-user --user-name alice - Attach a policy:
aws iam attach-user-policy --user-name alice --policy-arn arn:aws:iam::aws:policy/AmazonS3ReadOnlyAccess - Create an access key:
aws iam create-access-key --user-name alice - Get account info:
aws sts get-caller-identity
Be cautious when managing IAM via CLI — misconfigurations can lead to security breaches. Always follow the principle of least privilege.
Advanced Features: Querying, Filtering, and Output Control
One of the most powerful aspects of the AWS CLI is its ability to filter and format output. This becomes critical when dealing with large datasets returned by AWS APIs.
Leveraging JMESPath for Output Filtering
JMESPath is a query language for JSON, built into the AWS CLI via the --query parameter. It lets you extract exactly the data you need from complex responses.
For example, to get only the instance IDs and public IPs of running EC2 instances:
aws ec2 describe-instances --query 'Reservations[*].Instances[*].[InstanceId, PublicIpAddress]' --output table
Or to filter only instances with a specific tag:
aws ec2 describe-instances --filters "Name=tag:Environment,Values=production" --query "Reservations[*].Instances[*].InstanceId" --output text
JMESPath supports functions like length(), sort_by(), and conditional filtering, making it incredibly flexible.
Using Output Formats Effectively
The AWS CLI supports three main output formats:
- json: Default format, ideal for scripting and parsing with tools like
jq. - text: Tab-delimited, great for importing into spreadsheets or processing with
awk/cut. - table: Human-readable, perfect for quick inspections in the terminal.
Example:
aws ec2 describe-instances --output table produces a clean, formatted table of instances.
Automating Tasks with AWS CLI Scripts
Automation is where the AWS CLI truly shines. By combining CLI commands with shell scripting, you can build powerful tools that save hours of manual work.
Writing Bash Scripts for Routine Operations
You can write simple bash scripts to automate common tasks like backups, monitoring, or environment setup.
Example: Backup script to sync a folder to S3 daily
#!/bin/bash
BUCKET="s3://my-backup-bucket/daily/"
SOURCE="/home/user/data/"

aws s3 sync $SOURCE $BUCKET --delete
if [ $? -eq 0 ]; then
  echo "Backup successful at $(date)"
else
  echo "Backup failed" >&2
fi
Save this as backup.sh, make it executable (chmod +x backup.sh), and schedule it with cron.
Scheduling AWS CLI Tasks with Cron
On Linux and macOS, cron is a time-based job scheduler. You can use it to run AWS CLI commands at specific intervals.
To edit your crontab:
crontab -e
Add a line to run the backup script every day at 2 AM:
0 2 * * * /home/user/scripts/backup.sh
This ensures your data is backed up automatically without manual intervention.
Best Practices and Security Tips for AWS CLI
With great power comes great responsibility. The AWS CLI gives you deep access to your cloud environment, so following security best practices is non-negotiable.
Using Named Profiles for Multiple Accounts
If you manage multiple AWS accounts (e.g., dev, staging, prod), use named profiles to avoid confusion and credential leaks.
Configure a profile:
aws configure --profile production
Then use it in commands:
aws s3 ls s3://prod-bucket --profile production
Profiles are stored in ~/.aws/config and ~/.aws/credentials, allowing clean separation of environments.
Securing Access Keys and Secrets
Never commit AWS credentials to version control. Use environment variables or IAM roles instead.
Set credentials temporarily:
export AWS_ACCESS_KEY_ID=AKIA...
export AWS_SECRET_ACCESS_KEY=...
export AWS_DEFAULT_REGION=us-east-1
Alternatively, use AWS SSO or temporary tokens via aws sts get-session-token for short-lived access.
“Rotate access keys regularly and use multi-factor authentication (MFA) for root accounts.” — AWS IAM Best Practices
Troubleshooting Common AWS CLI Issues
Even experienced users run into issues. Knowing how to diagnose and fix common problems can save you hours of frustration.
Resolving Authentication and Permission Errors
If you see errors like InvalidClientTokenId or AccessDenied, check the following:
- Are your access keys correct and not expired?
- Is the IAM user associated with the keys granted the necessary permissions?
- Are you using the correct profile (
--profile)? - Is MFA required for the action?
Use aws sts get-caller-identity to verify which user/role you’re authenticated as.
Fixing Region and Endpoint Mismatch Problems
Some services are not available in all regions. If you get a Unknown endpoint error, confirm the service supports your specified region.
- Check region availability: AWS Regional Services List
- Set default region in config or use
--regionflag - Use
aws configure set region us-west-2to update default
Debugging with Verbose Logging
Enable debug mode to see detailed logs of what the CLI is doing:
aws s3 ls --debug
This shows HTTP requests, responses, and credential loading steps — invaluable for diagnosing connectivity or auth issues.
What is AWS CLI used for?
The AWS CLI is used to manage Amazon Web Services from the command line. It allows users to control services like EC2, S3, Lambda, and IAM through scripts and commands, enabling automation, faster operations, and integration into DevOps workflows.
How do I install AWS CLI on Windows?
Download the MSI installer from the official AWS site, run it, and follow the setup wizard. After installation, open Command Prompt or PowerShell and run aws --version to verify it works.
Can I use AWS CLI with multiple accounts?
Yes, you can use named profiles to manage multiple AWS accounts. Run aws configure --profile profile-name to set up different credentials and switch between them using the --profile flag.
Is AWS CLI free to use?
Yes, the AWS CLI tool itself is free. However, you are charged for the AWS services you use through it, such as EC2 instances, S3 storage, or data transfer fees.
How do I update AWS CLI to the latest version?
For AWS CLI v2, download the latest installer from the AWS website and reinstall. On Linux/macOS, you can also use the bundled installer script. For v1, use pip install --upgrade awscli, though v2 is recommended.
Mastering the AWS CLI unlocks a new level of efficiency and control in the cloud. From simple file uploads to complex automation scripts, it’s an indispensable tool for developers, DevOps engineers, and cloud architects. By understanding its syntax, leveraging powerful features like JMESPath, and following security best practices, you can streamline your workflows and reduce reliance on the web console. Whether you’re managing a single S3 bucket or orchestrating a multi-region deployment, the AWS CLI puts the full power of AWS at your fingertips — one command at a time.
Recommended for you 👇
Further Reading: